Tile Cutting Tips: How to Avoid Waste?
Tile cutting is a critical step in home improvement, directly affecting the beauty and functionality of the finished product. For DIY home improvement novices, cutting tiles can seem daunting. However, with the right techniques and tools, this job can be done efficiently. This article will provide practical tips for cutting tiles and strategies to reduce waste.
Preparation Before Cutting Tiles
Before you start cutting tile, adequate preparation is essential. Here are the steps to ensure the cutting process goes smoothly:
1. Choose the right tile:
Choose tiles that match your design requirements (quality, color, and specifications). Make sure the tile is suitable for the intended area, whether it is a floor, wall, or backsplash.
2. Gather necessary tools:
Prepare appropriate cutting tools based on the type of tile you are working on. Common tools include:
Tile cutter: A manual or electric tile cutter is ideal for straight cuts.
Angle grinder: For cutting thicker tiles or making intricate cuts.
Angle grinder blade for tile: These are essential for achieving clean cuts on ceramic or tile.
Also, prepare auxiliary materials such as pencils, rulers and marking lines for accurate measurements.
3. Ensure a safe working environment:
Set up your work area in a clean, organized manner. Make sure the area is well-lit and free of clutter to prevent accidents. Wear appropriate safety gear, such as goggles and gloves, to protect yourself during cutting.
Tile Cutting Methods
1. Manual cutting method
Manual cutting is one of the simplest and most commonly used methods for cutting tiles. It is particularly suitable for small areas or irregularly shaped tiles.
Tools required: Tile knife or sharp utility knife.
Process:
Mark the tile: Use a pencil or marker to draw a clear line where you want to cut the tile.
Scribing: Use the tile knife to gently scrape the tile surface along the marked line. Apply even pressure to create a consistent scribing line.
Breaking the tile: After scoring, place the tile on a flat surface so that the score line hangs over the edge. Apply downward pressure to the overhang to break the tile along the score line.
Note:
This method requires some skill and strength. If not done correctly, it may result in uneven or broken edges.
It works best with ceramic or softer tiles, as harder materials may be more difficult to cut manually.
2. Tile cutting machine cutting method
A tile cutter is a tool specifically designed to cut tile accurately and efficiently. This method is ideal for straight cuts and large projects.
Tools required: Manual or electric tile cutter.
Process:
Set up tile cutter: Place the tile on the platform of the cutter and adjust the cut size and depth as desired.
Mark the tile: For manual cutters, mark the tile by pulling the cutting wheel along the marked line. For electric cutters, follow the machine's instructions to begin cutting.
Break the tile: After scoring, apply pressure to break the tile along the scored line, or if using a power cutter, let the machine do the cutting.
Finish the edge: Use sandpaper or a polisher to smooth the cut edges for a more polished look.
Note:
Tile cutters allow for clean, precise cuts and are ideal for larger projects.
Make sure the tile cutter is properly calibrated to avoid inaccurate cuts.
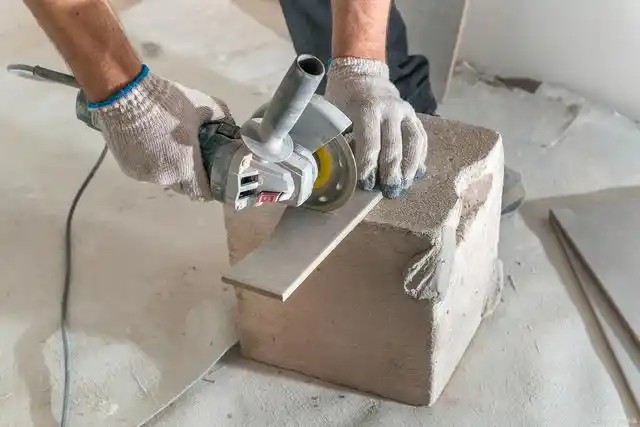
3. Angle grinder cutting method
An angle grinder is a versatile tool that can be used to cut tile, especially when dealing with curves or circles.
Tools required: Angle grinder with a ceramic tile cutting blade.
Process:
Mark the tile: Clearly mark the cut line on the tile.
Cutting tile: Hold the angle of the angle grinder consistently and apply gentle pressure as you move along the marked line. Maintain a steady speed to ensure an even cut.
Finish the edges: After cutting, you may want to smooth the edges with sandpaper or a grinder.
Note:
Angle grinders generate a lot of noise and dust, so protective equipment must be worn, including goggles, gloves, and a dust mask.
This method is best suited for more complex cuts and should be used with caution to avoid accidents.
Tips for Cutting Tiles
1. Accurate measurement and marking:
Use a ruler and pencil to accurately measure the tile. Clearly mark the cutting lines to ensure precision. Double-check the measurements before cutting to avoid mistakes.
2. Use the correct cutting technique:
For straight cuts, a tile cutter is usually the best choice. Score the tile along the marked line, then apply pressure to snap it along the score line.
For curved or complex cuts, you can use an angle grinder with a diamond blade. Make sure to work slowly and steadily to maintain control.
3. Cutting tiles in a controlled environment:
If possible, cut tile outside or in a well-ventilated area to minimize dust. If you can, use a wet saw as it reduces dust and helps keep the saw blade cooler, resulting in a cleaner cut.
4. Avoid over-cutting:
When cutting tile, avoid cutting too deep or cutting on the same line multiple times. This can cause the tile to chip or crack. Instead, focus on making a clean, single-cut.
5. Handle tiles with care:
After cutting, handle the tile gently to avoid chipping the edges. Lay it flat and avoid stacking it in a way that could put stress on the edges.
How to Avoid Tile Cutting Waste?
1. Optimize the design
Before you start cutting tiles, take the time to refine your design. Consider the layout and joining methods of the tiles from the beginning. Here are some tips:
Choose compatible patterns: Choose tile varieties that don't require complex color or pattern matching. That way, any cut pieces can be used elsewhere in the project, reducing waste.
Full tile plan: Use full tiles whenever possible as this minimizes the need for cutting and helps maintain an overall look.
2. Estimate the number of tiles needed
Accurately estimating the number of tiles you need is crucial to avoiding waste. Here are some tips for effective estimates:
Consult a designer: If possible, work with a designer to determine the appropriate size of the tile. They can help you create a tile layout diagram outlining the total quantities needed.
Measure carefully: Accurately measure the area of your room to ensure you purchase the correct number of tiles. This will help prevent over-buying and reduce excess waste.
3. Choose small-sized products
When choosing tiles, consider using smaller sizes, which are easier to adjust and join. The benefits of doing so are as follows:
Easier to adjust: Smaller tiles are generally easier to fit into tight spaces and are easier to adjust than larger tiles. This flexibility helps reduce waste from improper cutting.
Creative layouts: Smaller tiles can allow for more creative layouts, which can help you use your remaining pieces more efficiently.
4. Use design elements cleverly
Strategically incorporating design elements can help minimize the need to cut tile. Consider the following:
Use decorative elements: Incorporate waist moldings, patterned tiles, or floor borders into your design. These elements help reduce the need for cutting and add visual interest to your space.
Mirror and fixture size: When planning bathroom walls or other areas, consider the size of mirrors and fixtures. Designing around these elements can help reduce the need to cut tile.
5. Practice meticulous cutting techniques
When cutting tile, using careful techniques can also help reduce waste:
Think twice: Always double-check your measurements before cutting to avoid mistakes that result in wasted material.
Use the right tool: Make sure you use the appropriate cutting tool for the type of tile you are working on. This will help achieve a cleaner cut and reduce the likelihood of breakage.
In Conclusion
Tile cutting is a delicate job that requires careful planning and execution. By optimizing your design, accurately estimating the number of tiles needed, choosing smaller products, using design elements creatively, and practicing careful cutting techniques, you can significantly reduce waste. These strategies will not only improve the efficiency and quality of your decorating projects but will also save you costs and resources in the long run. With these tips in mind, you can approach your tile cutting tasks with confidence and precision.
-
Online service
-
Official wechat account

-
QQ:844389055
-
E-mail:VIP@zliontools.com
Online Message
Please feel free to give your inquiry in the form below. We will reply you in 24 hours.